It takes some time to paint wood surfaces, but it is not difficult. Wood exhibits distinct behaviors compared to other surfaces like metal, drywall, or painted walls. Primers are usually required because paint absorbs quickly on bare, untreated wood.
Sand-coated or painted wood very gently to give the primer a little traction. In turn, the primer gives the paint a grip. You may paint a tiny wood piece, such as a table or nightstand, in hours, and the outcome will be gorgeous.
Materials You’ll Need
Obtain the required supplies and equipment before beginning the interior & exterior painting preparation process:
- Sandpaper: Its grits include a variety of sizes.
- Wood Filler: Fill up any gaps, fractures, or holes in the wood.
- Putty Knife: For applying wood filler and scraping away excess.
- Tape for Painters: To shield areas not to be painted.
- Drop Cloths or Plastic Sheeting: To avoid splattering paint all over the surrounding surroundings.
- Tack Cloth: To clear the surface of dust and particles.
- Primer: A high-quality wood primer suitable for your specific project.
- Paint: Choose a paint that suits the type of wood and the desired finish.
Tools
- Orbital Sander: Optional but recommended for larger surfaces.
- Paint Scraper: To remove old paint or finishes.
- Wire Brush: For cleaning and prepping rough or weathered wood.
- Sanding Block: Useful for hand sanding in tight areas.
- Clean Cloth or Sponge: For wiping down the wood surface.
Now that you have everything, let’s proceed with the step-by-step instructions.
Clear the Work Area
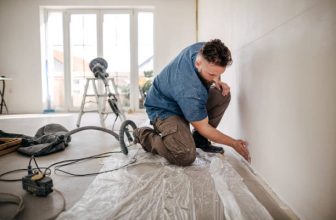
To start, take out any decorations, furniture, or other objects that could be in the way. To guarantee that the wood surfaces you intend to paint can be easily accessed, clear the workspace. To prevent paint spatter and particles from landing on nearby items and flooring, place drop cloths or plastic sheeting down.
Inspect and Clean the Wood Surface
Careful examination and meticulous cleaning are essential to protect and prolong the life of wood surfaces. Early detection of flaws like mold or cracks guarantees prompt repair. You can preserve the longevity and aesthetic appeal of your wood surface while safeguarding its structural integrity with the appropriate cleaning agents and techniques.
Check for Damage
Inspect the wood surface for damage, such as cracks, holes, or dents. Addressing these issues before painting will produce a more polished and professional finish.
Clean the Surface:
To remove any filth, grease, or grime, clean the wood surface with a clean cloth or sponge. To guarantee thorough cleaning, use a mild detergent solution for cleaning outside projects or anything exposed to the elements.
Remove Old Paint or Finish
Refinishing surfaces requires removing old paint or finish to provide a blank canvas for new applications. Depending on the material and project needs, a variety of techniques are used, such as sanding, chemical stripping, or heat guns. Removing material effectively increases its longevity and improves its appearance.
Sanding
If the wood surface has old paint or finish, use an orbital sander with coarse grit sandpaper to remove it efficiently. To prevent scratches, sand in the direction of the grain of the wood. A sanding block or manual sanding may be necessary for intricate or detailed areas.
Paint Scraper
In areas where sanding is challenging, use a paint scraper to lift off old paint or finishes gently. Be cautious not to gouge or damage the wood. A wire brush can also be effective for removing loose or peeling paint.
Repair and Fill
Repair and fill techniques are crucial to fix flaws, holes, or fissures in damaged surfaces. These treatments, which range from epoxy fillers to spackling chemicals, offer a smooth surface for later finishing. A perfect and long-lasting outcome depends on accuracy when filling and repairing wood, drywall, and other materials.
Fill Holes and Cracks
Fill wood gaps, fractures, and other imperfections with wood filler. Spread filler evenly with a putty knife to level. Before proceeding to the following step, let the filler entirely dry.
Sand Smooth
After the wood filler dries, smooth the mended areas with medium-grit sandpaper. Feather the edges to blend the filled areas with the surrounding wood seamlessly.
Sand the Wood Surface
An essential first step in woodworking and refinishing jobs is sanding the wood surface. Wood is rubbed using abrasive materials to smooth, shape, or prepare it for finishing. Sanding wood properly guarantees that it is susceptible to paints, stains, and sealants and improves its appearance by eliminating defects.
Select the Right Grit
Begin sanding the entire wood surface using coarse grit sandpaper (60-80 grit) to remove any remaining imperfections, rough spots, or uneven surfaces. Gradually progress to medium (120-150 grit) and finish with fine sandpaper (220 grit) for a smooth, even finish.
Orbital Sander
An orbital sander can speed up the sanding process for larger surfaces, providing a more consistent result. Ensure you move the sander evenly across the wood surface, avoiding over-sanding in one spot.
Hand Sanding
Sand by hand in corners, edges, and other hard-to-reach areas using a sanding block or sandpaper rolled around a block. This ensures every part of the wood surface is adequately prepped.
Clean the Surface
In many tasks, cleaning the surface is an essential first step that guarantees a spotless base for later work. Cleaning off dirt, grease, and impurities is crucial when painting, repairing, or refinishing. Extensive cleaning improves adherence and adds to the surface treatment’s overall durability and aesthetic appeal.
Fine dust will be applied to the wood surface following sanding. Use a tack cloth to remove any last bits of dust or dirt so the surface is clean for priming and painting. Make sure to reach into crevices and corners to remove all sanding residue.
Masking and Taping
When it comes to precise painting and refinishing, masking and tape are essential skills. Supplies such as painter’s tape shield certain regions from undesired paint applications, guaranteeing crisp edges and bounds. For a variety of tasks to seem clean and professional, careful masking and taping are essential, whether for separating areas or protecting trims.
Keep the Surrounding Areas Safe
Wherever you don’t want to paint, cover and shield with painter’s tape. This includes adjacent walls, trim, or any surfaces that should remain unpainted. Take your time to ensure precise taping for clean lines.
Cover Floors and Furniture
Make sure that drop cloths or plastic sheeting covers all floors and adjacent furniture to avoid spills or splatters.
Apply Primer
One essential first step in surface enhancement is applying primer, which provides the best possible base for finishing touches. This bonding layer improves durability, seals porous surfaces, and encourages paint adhesion. Applying primer to walls, furniture, or other substrates guarantees a smoother, more colorful, and long-lasting final coat for various jobs.
Importance of Primer
Priming is a crucial step that ensures better paint adhesion, enhances durability, and provides a more even finish. Choose a high-quality wood primer suitable for your specific project.
Application
Apply the primer evenly using a paintbrush or roller, following the wood grain. Follow the manufacturer’s instructions and let the primer dry completely. Some primers may require multiple coats, so follow the recommended drying times between coats.
Sand Primer Coat (Optional)
Sanding the priming coat is an optional but helpful step for a perfect finish. This procedure improves adhesion, smoothens flaws, and creates a uniform surface texture. Although it’s not always necessary, sanding the primer layer smooths the substrate and creates ideal conditions for the next coatings, which helps to produce a polished finish.
Light Sanding
To provide a smooth and even base for the paint, softly sand the primer-covered area with 220-grit fine-grit sandpaper once it has dried. Before proceeding to the last painting stage, use a tack cloth to remove any last bits of sanding residue.
Apply Paint
Painting is the magical finishing touch for a variety of tasks, giving surfaces colour, personality, and protection. The selection of brushes, rollers, or sprayers, along with meticulous technique, guarantees a professional and aesthetically pleasing outcome that improves the overall durability and aesthetic appeal, whether sprucing up walls, furniture, or crafts.
Choosing the Right Paint
Select a high-quality paint suitable for the wood surface and your desired finish. When applying latex, oil-based, or speciality paint, adhere to the manufacturer’s application and drying time recommendations.
Painting Technique
Utilising a brush, roller, or spray gun, evenly apply the paint. To get a finish that looks professional, use long, flowing strokes in the direction of the wood grain. Let the initial coat fully dry before adding more applications as necessary.
Conclusion
In conclusion, meticulous preparation is the cornerstone of a successful wood painting project. Following the detailed instructions above will help to prolong the painted surface’s life and guarantee a perfect, visually appealing finish. Taking the time to inspect, clean, repair, and appropriately sand the wood sets the stage for optimal paint adhesion, resulting in a professional look that withstands the test of time. Remember, the investment in thorough preparation pays off in the vibrancy and durability of the final printed product.
For further guidance and professional assistance with your painting endeavors, we invite you to visit the website of A One Korean Painting. Our professionals are skilled in providing excellent painting solutions, from surface preparation to the last coat of paint. Explore a plethora of information, professional advice, and a gallery of our outstanding projects. With A One Korean Painting, you can turn any wood surface into a work of beauty where perfection and accuracy meet. Visit our website today!